Key takeaways
- Most RVs need about 200 to 600 watts of solar to run the essentials off the grid. Full-timers commonly need 400 to 800 watts, and air conditioning takes far more.
- Every RV solar system has four core parts: panels, an MPPT (maximum power point tracking) charge controller, a battery bank and a pure sine wave inverter.
- Size the battery bank generously. Panels can only charge what your batteries can hold.
- Most early failures come from undersized batteries, panel shading, poor roof sealing and missing fuses, all of which are avoidable.
- A 400 watt kit is the most popular starting point. Our five picks are below.
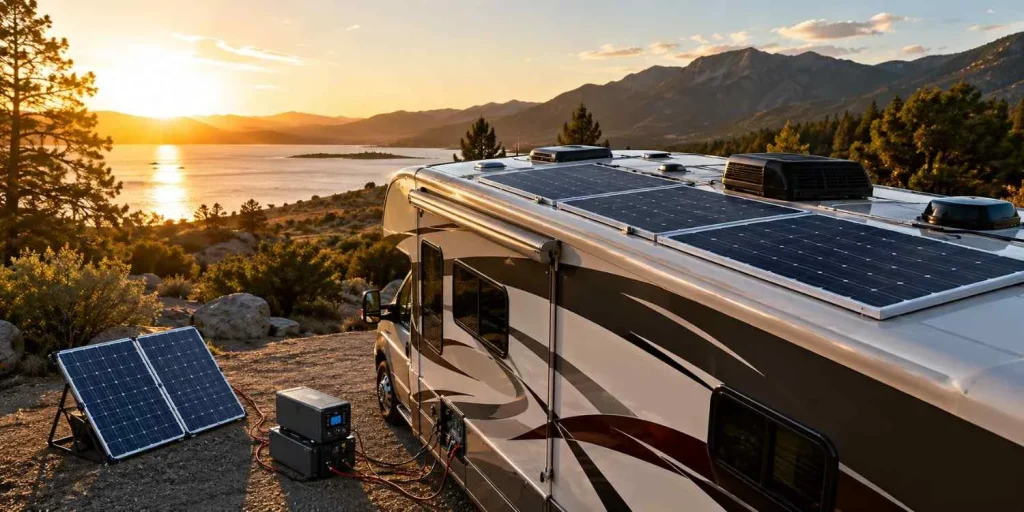
RV solar systems let you camp beyond the hookups. There is no generator noise, no fuel to carry and no daily fee for shore power, and the sun does the work wherever you park. This guide puts everything in one place: how RV solar systems work, how to size one from your own daily power use, which kits are worth a look, how to mount and wire a system safely, and the mistakes that shorten its life. Some links go to products we recommend, and PreciousRV may earn a commission if you buy through them, at no extra cost to you (details at the end).
How RV solar systems work
Sunlight hits the panels and creates direct current (DC) electricity. That power travels through wiring to a charge controller, which regulates the voltage and stops the batteries from overcharging. The regulated power flows into the battery bank, where it is stored. When you need electricity, your 12 volt devices draw from the batteries directly, and an inverter converts stored DC power into the 120 volt alternating current (AC) power your household-style appliances need.
The four core components of an RV solar system
1. Solar panels
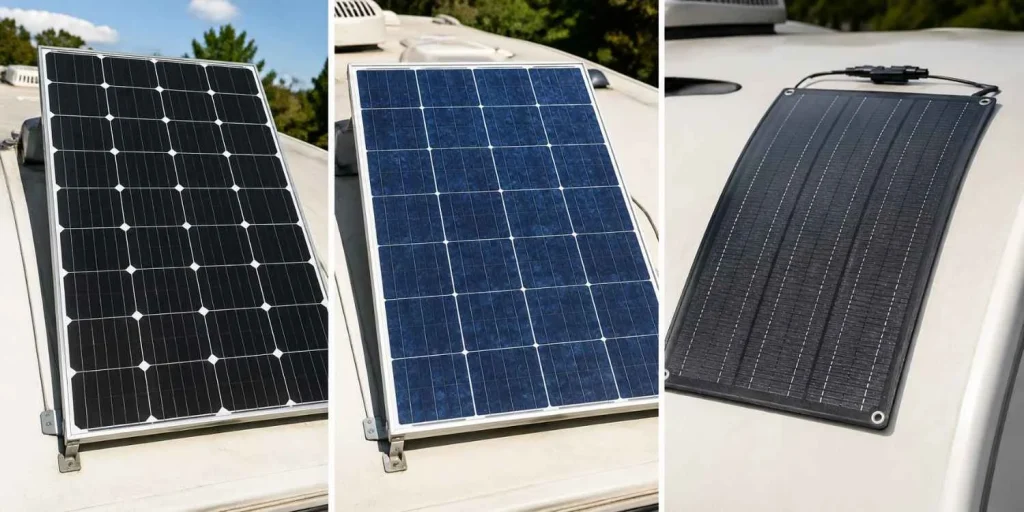
There are three main panel types. Monocrystalline panels are made from a single silicon crystal and convert roughly 19 to 23 percent of sunlight into electricity. They also handle low light and overcast conditions better, so for most RV builds they are the right choice. Polycrystalline panels convert about 15 to 17 percent. They cost less per watt but need more roof space for the same output. Flexible panels are light and can follow a curved roofline, but they run hotter because air cannot circulate behind them, and they tend to wear out faster.
As a starting point, weekend campers often do well with 200 to 400 watts of panels. Full-timers commonly need 400 to 800 watts, and heavy users with air conditioning or a home office may need 1,000 watts or more.
2. Charge controllers: MPPT vs. PWM
The charge controller sits between the panels and the batteries. PWM (pulse width modulation) controllers are the older, simpler design and waste more of the panels’ output. MPPT (maximum power point tracking) controllers are the modern standard and commonly capture 20 to 30 percent more energy, especially in cooler weather or when panels are partly shaded. For any system over about 200 watts, choose MPPT. A 40 amp MPPT controller is the usual match for a 400 watt array on a 12 volt system, which produces roughly 33 amps at most. Larger arrays may need a 60 amp controller or two controllers.
3. Battery bank: lithium vs. AGM
Your batteries store the power your panels make so you can use it after dark. AGM (absorbent glass mat) batteries are affordable and widely available, but they are heavy and you can safely use only about 50 percent of their rated capacity. A 200 amp-hour AGM bank gives you roughly 100 amp-hours you can actually use. Lithium iron phosphate (LiFePO4) batteries cost more up front but weigh far less, typically last 2,000 to 5,000 charge cycles compared with a few hundred for AGM, and can be discharged to 80 percent or more of their capacity. A 200 amp-hour lithium battery gives you close to 180 usable amp-hours. For full-time or frequent travel, lithium usually costs less over its lifetime.
A good target is enough battery capacity to cover about two days of your average use with no sun at all.
4. Inverter
The inverter turns battery power into 120 volt AC. A pure sine wave inverter produces clean power that is safe for laptops, medical devices, induction cooktops and other sensitive electronics. Modified sine wave inverters are cheaper, but some devices run hot, buzz or get damaged. The price gap has narrowed, so choose pure sine wave. To size one, add up the wattage of everything you might run at the same time and add a 20 percent buffer. A 1,000 watt pure sine wave inverter handles a laptop, lights and small appliances. A 2,000 watt inverter covers most RV loads, and air conditioning or an induction cooktop calls for 3,000 watts or more.
How much solar does your RV need?
Sizing is the most important step, and it starts with your own power use, not with a kit’s marketing. Undersized systems leave you rationing power. Oversized systems waste money. Follow these four steps.
Step 1: Calculate your daily energy use
List each device, multiply its wattage by the hours you use it each day, and add the results. That gives you daily watt-hours (Wh). Here is an example for a couple working from the road:
| Device | Watts | Hours per day | Watt-hours |
|---|---|---|---|
| 12V compressor fridge (45W while running, about 35% of the day) | 45W | 24 hrs x 35% | 378 Wh |
| Laptop | 65W | 4 hrs | 260 Wh |
| LED lighting | 20W | 5 hrs | 100 Wh |
| Phone charging | 10W | 2 hrs | 20 Wh |
| Fan | 30W | 8 hrs | 240 Wh |
| Total | about 998 Wh |
Step 2: Work out how many panels you need
Divide your daily watt-hours by the peak sun hours where you camp. Most of the continental U.S. gets about 4 to 6 hours a day. In the example, 998 Wh divided by 5 peak sun hours is roughly 200 watts of panels in ideal conditions. Then add at least a 25 percent buffer for dust, shade and imperfect sun angles. That puts this example at 250 to 300 watts, and 400 watts if you want comfortable headroom on cloudy days.
Step 3: Choose your battery capacity
Store enough for one to two days without any sun. For roughly 1,000 Wh of daily use, two days means about 2,000 Wh, or about 166 amp-hours of usable lithium capacity at 12 volts. With AGM you need about double that, near 330 amp-hours, because you should only use half of it.
Step 4: Match your charge controller
Divide your total panel wattage by the system voltage to find the maximum current. A 400 watt array on a 12 volt system produces about 33 amps, so a 40 amp MPPT controller is the right size, like the one included in the Renogy kit below. If you plan to add panels later, buy a controller with room to grow. Not sure how your rig’s electrical system fits together? Our guide to 30 amp vs. 50 amp RV service explains the basics.
Best RV solar kits and panels right now
These five options each suit a different kind of RV owner. Specifications and prices change often, so confirm what is included in the version you order before you buy.
| Pick | Best for | Why it stands out |
|---|---|---|
| Renogy 400 Watt 12 Volt Solar RV Kit | Best overall | A complete starter kit: monocrystalline panels, a 40 amp MPPT controller and roof mounting brackets. It is the easiest way to get started without piecing parts together. |
| Rich Solar 400 Watt Solar Kit | Best runner-up | Competes closely with Renogy on price and performance. Two larger panels instead of four can make roof layout and wiring simpler for DIY installers. |
| BougeRV Yuma 200 Watt Flexible Panel | Curved roofs and light weight | A flexible panel that can follow a rounded roofline, or be set out on the ground and angled toward the sun. |
| Jackery SolarSaga 200W Panel | Portable setups | A foldable panel that pairs with Jackery Explorer power stations for a no-installation solar setup. Most people use two to reach 400 watts. |
| BLUETTI PV420 Solar Panel | Limited roof space | A single high-output panel, useful when you want the most power from the fewest panels. See our BLUETTI RV solar guide for their power stations and full systems. |
Prefer an all-in-one battery system instead of building from parts? Read our Renogy solar for RVs guide for the Go Far and Go Further systems, or shop Renogy solar directly.
RV solar mounting systems
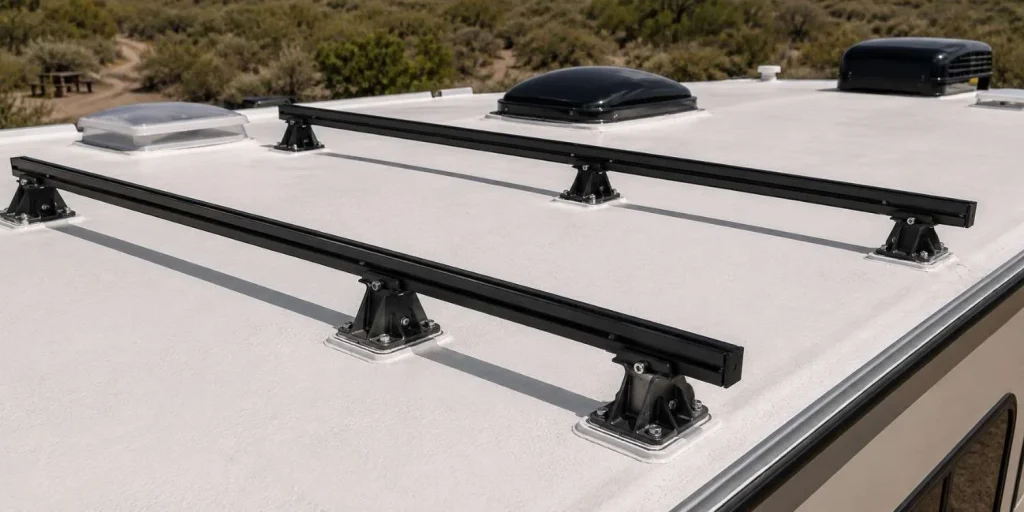
Flush mount vs. tilt mount
Flush mounts keep panels close to the roof, so they add little wind drag and stay put at highway speed. Limited airflow underneath lets heat build up, which trims efficiency slightly on hot days. For RVers who move often, flush mounting is usually the best balance. Tilt mounts angle panels toward the sun and can raise output by 30 percent or more on a clear winter day, but they create drag and stress the hardware, so most people lower them before driving.
Penetrating vs. non-penetrating mounts
Penetrating mounts bolt through the roof. Installed with butyl tape under each foot and self-leveling lap sealant over every penetration, they are very secure at highway speed. Non-penetrating mounts use adhesive or roof-edge clamps and avoid drilling. They work well on rubber (EPDM, ethylene propylene diene monomer) roofs in low-wind conditions, but carry more risk of panel lift in high wind or at speed.
Mounting by RV type
- Class A and Class C motorhomes: flat roofs with plenty of room. Plan around vents, air conditioners, antennas and skylights.
- Travel trailers and fifth wheels: good roof space, but the front cap is often curved or sloped. Plan panels toward the rear two-thirds of the roof.
- Vans and Class B campers: tight roof space with racks, fans and rails. Flexible or compact rigid panels with low-profile mounts work best.
RV solar panel installation step by step
Many RV owners install their own systems. The wiring is low-voltage DC, which is far safer than household AC, but mistakes can still be costly. Poor roof sealing causes water damage, undersized wire creates heat and fire risk, and unfused connections allow dangerous current. If any step makes you uncomfortable, hire a solar installer or qualified RV technician for that part.
Tools and safety gear
- Drill and bits sized for your mounting hardware
- Screwdrivers, wire strippers and a crimping tool
- Multimeter for voltage testing
- Self-leveling lap sealant (Dicor is a common RV choice) and butyl tape
- MC4 connector tool (MC4 is the standard plug on solar panel cables)
- Safety glasses and non-slip footwear for roof work
- Cable ties and conduit for wire management
Step by step
- Plan first. Map panel placement so vents, air conditioners and antennas do not shade any panel during the 10 a.m. to 3 p.m. window. Lay out where each component will sit inside before running any wire.
- Mount the hardware. Drill pilot holes, apply sealant before setting each bracket, fasten with stainless steel screws, then seal over the bracket base and screw heads. Skimping on sealant is one of the costliest DIY mistakes.
- Route wiring through a cable entry gland. Never drill a bare hole and pass wire through it. Use solar-rated, UV-resistant cable, and size the wire to the current and the length of the run. Check the kit’s manual or a voltage-drop chart, and when in doubt go one size heavier.
- Connect the battery side first. Wire the charge controller to the battery bank with short, heavy-gauge cable, then connect the panels. Never connect panels to a controller that is not yet attached to a battery.
- Fuse everything. Every positive wire leaving a battery needs a fuse as close to the terminal as possible, sized to match the wire and the load. Add a battery disconnect switch for safe maintenance.
- Test before you close up. With sun on the panels, check voltage at the battery terminals and confirm the controller is charging. Run the inverter under a known load for at least 30 minutes, and give every terminal a firm tug to check for loose connections.
Should you add wind power?
A small wind turbine can produce power at night and during storms, when solar output drops. It makes sense if you camp for weeks in windy places such as coasts, open plains and ridges, or travel through cloudy regions like the Pacific Northwest. If you move every few days through the sunny Southwest, the extra cost and complexity are probably not worth it. Many MPPT controllers accept dual inputs, but check that yours can handle the extra current before you buy. The goal of a hybrid system is not to double your power, it is to smooth out the gaps.
Common RV solar mistakes that shorten a system’s life
- Undersizing the battery bank. If your batteries fill by noon, every watt the panels make afterward is wasted. If money is tight, prioritize batteries over more panels.
- Ignoring shade. In a series-wired array, shading a small part of one panel can cut the whole array’s output sharply. Plan placement around roof obstructions, and ask whether bypass diodes, optimizers or a different wiring layout suit your setup.
- Cutting corners on sealing. One leaking mounting foot can cause thousands of dollars in roof damage.
- Skipping fuses or using undersized wire. This is a fire risk, not just a performance issue.
- Buying for a lifestyle you do not have. Match the system to how you actually travel, not how you hope to.
Maintenance tips
- Clean the panels regularly with a soft brush and water. Dust, pollen and bird droppings reduce output.
- Inspect roof seals twice a year. Check every mounting foot and cable entry for cracks or separation, and reseal anything questionable.
- Check battery terminals and connections every few months. Vibration loosens them over time.
- Watch your data. Many MPPT controllers have Bluetooth monitoring. A sudden drop in daily production can signal shading or a failing panel.
- Keep the battery compartment ventilated. Even lithium batteries benefit from airflow. For general upkeep, see our complete RV maintenance guide.
Which RV solar system fits how you travel?
| Travel style | Panels | Batteries | Notes |
|---|---|---|---|
| Weekend camper | 200 to 400W (portable or roof) | Small lithium or AGM bank | A portable panel plus a power station can be enough. |
| Frequent traveler | 400W roof-mounted | Lithium sized for about two days | Use an MPPT controller with room to expand. |
| Full-timer | 600 to 800W or more | Larger lithium bank | Plan for future expansion. Use pure sine wave inverter. |
| Off-grid air conditioning | 1,000W or more | Large lithium bank | Requires a high-capacity inverter. Consider a soft-start device. |
Frequently asked questions about RV solar systems
How many solar panels does an RV need to run full-time?
Most full-time RVers need between 400 and 800 watts of panels, depending on daily use. Heavy users running air conditioning, an induction cooktop or home-office equipment may need 1,000 watts or more. Calculate your daily watt-hours first, then size the panels to match.
How much solar do I need to run an RV air conditioner?
It is one of the most demanding loads you can put on a solar system. A 13,500 BTU (British thermal unit) rooftop unit commonly draws roughly 1,200 to 1,500 watts while running and much more for a moment at startup. You would need 1,000 watts or more of panels, a large lithium bank and a high-capacity pure sine wave inverter. A soft-start device can cut the startup surge, but check the manufacturer’s specifications for your unit.
Can RV solar panels charge batteries while I drive?
Yes. Panels charge whenever sunlight hits them, whether the RV is parked or moving. Many RVers also add a DC-to-DC (battery-to-battery) charger that charges the house batteries from the vehicle’s alternator while driving, so you can arrive with the bank already topped up.
Do RV solar systems work in winter or on cloudy days?
Yes, with reduced output. On cloudy or rainy days, panels typically produce roughly 10 to 25 percent of their rated output. Monocrystalline panels handle low light best. A properly sized battery bank with two or more days of storage covers most short cloudy stretches.
How long do RV solar panels last?
Quality panels are typically rated to produce at least 80 percent of their original output after 25 years, and they often keep working longer. Wiring connections, charge controllers and batteries usually fail first. Lithium batteries last roughly 10 to 15 years in typical RV use, AGM often 3 to 5.
What size inverter do I need?
Add up the wattage of everything you may run at the same time, plus about 20 percent. A laptop, lights and small appliances are comfortable on 1,000 to 2,000 watts. Microwaves, coffee makers and hair dryers push you toward 2,000 to 3,000 watts, and air conditioning or an induction cooktop needs 3,000 watts or more. Always choose pure sine wave.
Can I install RV solar myself?
Many owners do. The mounting work needs basic comfort with a drill and roof sealant, and the wiring is low-voltage DC. Get help if you have a complex roof, are tying into an existing electrical system, or are installing a large system, roughly 800 watts and up.
How much does a full RV solar system cost?
Prices vary widely and change often, so treat these as rough ranges. An entry-level system with about 400 watts of panels, a controller, a 100 amp-hour lithium battery and a 1,000 watt inverter often lands between $1,200 and $2,000. Mid-size systems with 600 to 800 watts and more storage commonly run $2,500 to $4,500. Large full-time systems can exceed $6,000, before installation.
Is it worth adding wind to an RV solar system?
It depends on your routes. If you often camp in windy coastal, plains or mountain areas, a small turbine adds resilience, because it can produce at night and during storms. If you mostly camp in sunny, calm places and move often, it may not be worth the added complexity.
Related RV solar and power guides
- Renogy solar for RVs: a guide to powering your adventures off-grid
- BLUETTI RV solar power systems and solutions
- 30 amp vs. 50 amp RV: what is the difference?
- RV maintenance: a complete guide
Build the RV solar system that fits your life
There is no one-size-fits-all RV solar system. A weekend camper in the desert Southwest needs something very different from a full-time family in the Pacific Northwest in October. Start with your real power needs, choose quality components, size the batteries generously, and mount and seal everything carefully. For more independent guidance on solar equipment, see SolarReviews. Solar gives you something no campground hookup can: the freedom to park where the view is best and stay as long as you like.