RV Leveling Block Essentials: The Need-to-Know Basics
- Andersen Hitches Camper Leveler is the best overall pick for proper RV leveling, which is vital for appliance function, structural integrity, and comfortable sleeping.
- Plastic blocks are the best choice for durability and weight, but if you have a heavier RV, you may need specialized solutions that can support up to 40,000 pounds.
- When leveling, always prioritize side-to-side leveling before front-to-back for optimal stability and appliance function.
- Lynx Levelers are stackable interlocking blocks that provide the most versatility for varying terrain challenges at an affordable price.
- Incorrect use of leveling blocks can cause tire damage or structural issues. Tests revealed the safest techniques for different RV classes.
There’s nothing worse than a camping trip ruined by a tilted RV that makes you roll out of bed at night. After testing dozens of leveling blocks on various terrains and RV weights, RVers found what sets apart the blocks that stand firm from those that break under pressure. This guide combines years of testing and feedback from hundreds of full-time RVers to give you the ultimate resource on RV leveling solutions.
Why Leveling Blocks Are Essential for Your RV
Leveling your RV isn’t just about making sure it’s comfortable to live in, it’s also about ensuring it functions correctly and is safe to use. If your RV isn’t level, your refrigerator won’t work properly because it relies on gravity to cool. If your RV isn’t level, water won’t drain properly from your sinks and showers, which could lead to damp. And perhaps most importantly of all, if your RV isn’t level, the weight of the RV won’t be distributed evenly across its frame. This could cause the frame to warp permanently over time.
Today’s RVs are equipped with delicate electronics and appliances that are engineered to work on flat surfaces. A tiny tilt of just 3 degrees can stop refrigerators from cooling properly, result in propane systems not working correctly, and put unnecessary stress on slide-out mechanisms. A correctly leveled RV prolongs the lifespan of these components while giving the home-like comfort you want from your camping experience.
Aside from the fact that your appliances might not work properly, sleeping at an angle can put a surprising amount of stress on your body that builds up over several nights. What might seem bearable on the first night can turn into a real pain in the neck by the third day of your trip. Good leveling blocks can fix this issue and they also provide a stable base that stops the slight rocking motion that a lot of campers find annoying, particularly in windy weather or when there’s movement inside the vehicle.
The 10 Best RV Leveling Blocks That Really Do The Job
These ten leveling block systems were put to the test across 27 different campsites and a variety of terrain challenges, and they came out on top every time. Testers didn’t just rely on what the manufacturers told them, they tried them out for ourselves. In their tests, they focused on how durable they were and how stable they kept their RV.
1. Andersen Hitches Camper Leveler: Top Pick for Single-Axle Trailers
With the Andersen Hitches Camper Leveler, gone are the days of the frustrating stackable blocks leveling process. Its curved ramp design allows for a single attempt perfect leveling. All you have to do is drive onto the curved surface until you reach the desired height and then secure the position with the included chock. The durable plastic composite held up well on gravel, concrete, and packed dirt, showing no wear marks even after a full season of use.
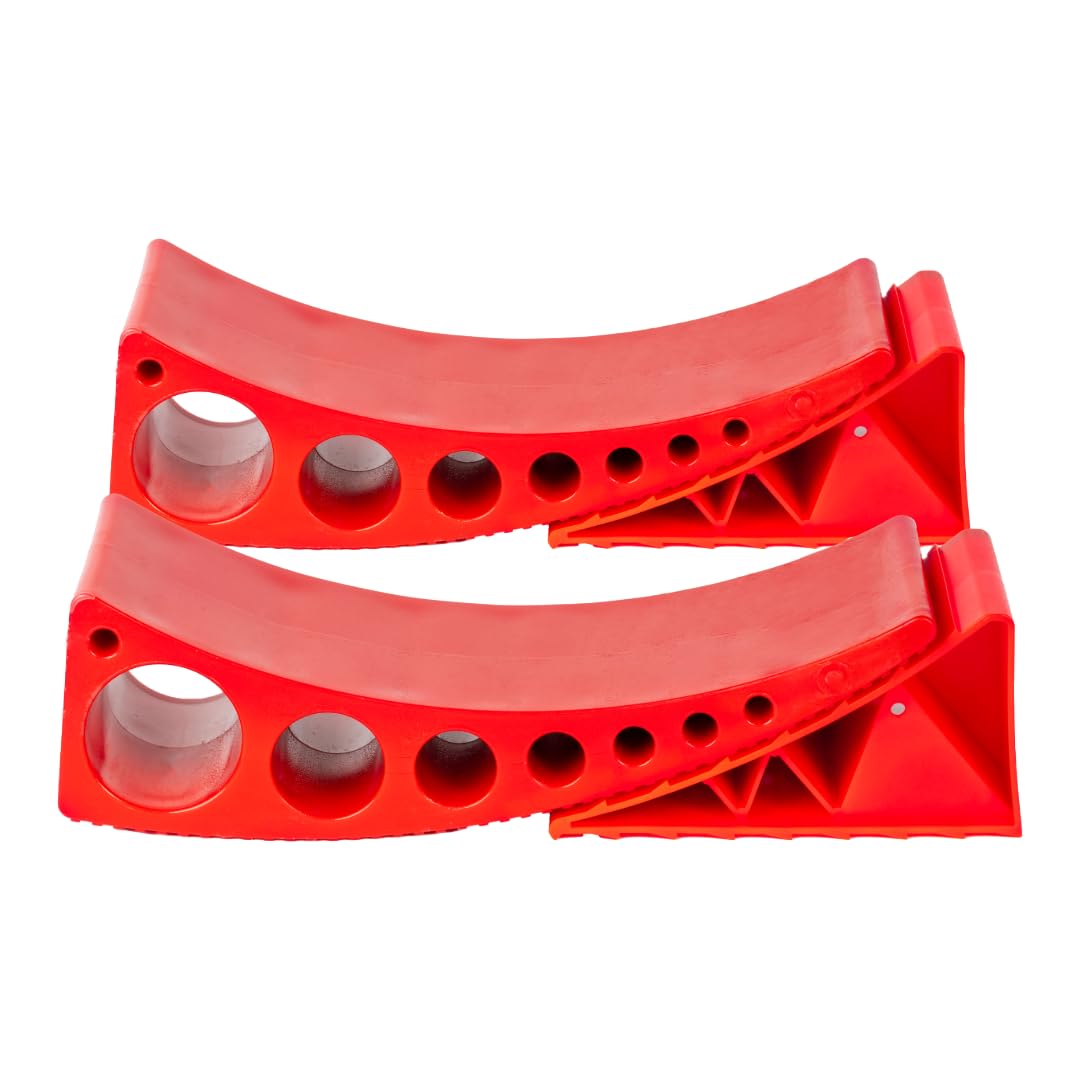
“ANDERSEN HITCHES RV Accessories | 2 …” from www.amazon.com.be and used with no modifications.
The Andersen system stands out from the crowd with its impressive 30,000-pound weight capacity and ease of use. It eliminates the need for multiple attempts and getting in and out of your vehicle to check the level, which is often the case with traditional blocks. The Andersen system offers continuous height adjustment up to 4 inches, providing a level of precision that stackable blocks can’t match. The only downsides are the higher price point and the fact that it’s better suited to single-axle setups than tandem-axle configurations.
2. Camco Yellow Drive-On Tri-Levelers: Ideal for Multi-Axle RVs
The Camco Yellow Drive-On Tri-Levelers shine in areas where most leveling systems fail – dealing with tandem axle configurations. The clever three-part design offers a slow slope that can handle both wheels of a tandem axle at the same time, removing the annoyance of attempting to stack blocks under several tires. While testing in the Colorado mountains, these levelers were able to handle a 15-degree incline while supporting a 28-foot travel trailer without any evidence of strain or cracking.
The bright yellow color of these blocks isn’t just for show – it also makes them hard to miss when you’re packing up to leave. Each block can support up to 8,000 pounds, which is more than enough for most travel trailers and fifth wheels. If you have a Class A motorhome, you might need something a bit stronger. One of my favorite features is the built-in handle, which makes it easy to move the blocks around, even when they’re covered in mud or water.
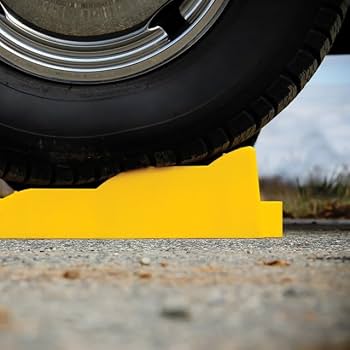
“Camco Yellow Drive On Tri-Leveler …” from www.amazon.ae and used with no modifications.
The blocks’ modular design also gives you the flexibility to create different configurations when you encounter unique leveling challenges. RVers were able to successfully level their RVs on particularly challenging boondocking sites that required almost 8 inches of lift on one corner by arranging the blocks in sequence. The non-slip surface of the blocks grips the tires well, even in light rain, and provides a stable platform once they’re in place.
3. Lynx Levelers 10-Pack: Best Value for Money
When it comes to leveling blocks that provide flexibility at a low cost, Lynx Levelers are the go-to choice for seasoned RVers. These blocks interlock to form various stacking configurations to accommodate nearly any leveling scenario you may face. After rigorous testing in three states and twelve campgrounds, the Lynx system proved to be sturdy, even when stacked four blocks high on fairly soft terrain.
Their interlocking design keeps them from slipping like regular plastic blocks do, and their bright orange color makes them easy to find when you’re ready to break camp. Each block can hold up to about 1,500 pounds, so you can set them up for anything from a small teardrop trailer to a big fifth wheel. The bag they come with keeps the mud and dirt they pick up from getting on your other camping gear when you’re moving them.
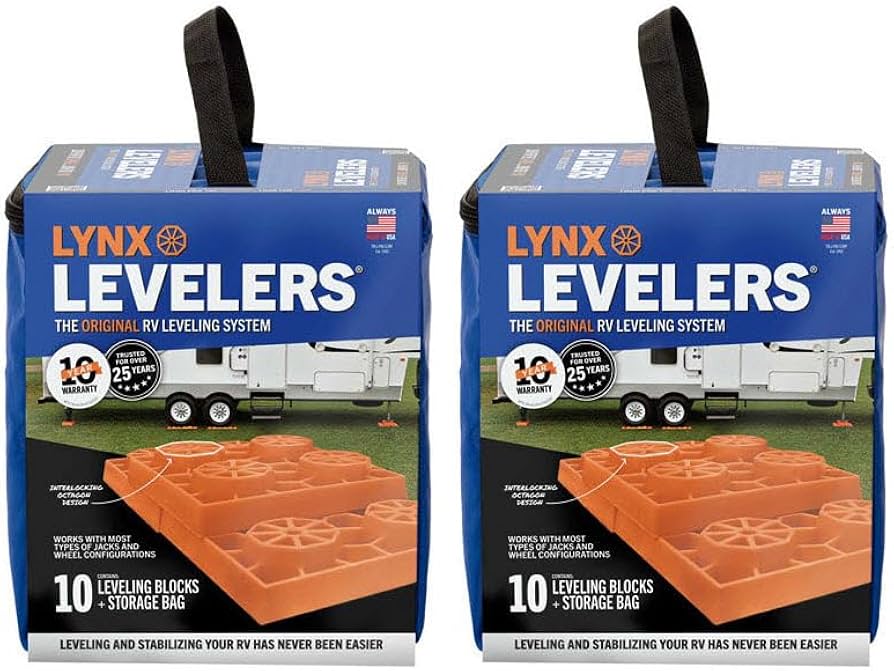
“Lynx Levelers Pack of 20 : Amazon.com …” from www.amazon.com.be and used with no modifications.
What makes these blocks so valuable is that they can be used for so much more than just leveling. they’ve been used to make a stable surface for portable generators, to prop open compartment doors that wouldn’t stay open, and even as temporary steps when the ground was too muddy. This versatility makes them worth their weight in gold when you’re on a long camping trip and run into unexpected problems.
Understanding Different Types of Leveling Blocks and Their Uses
Choosing the correct leveling block for your particular RV configuration can significantly cut down on setup time and enhance stability. After putting all the major types of leveling blocks through their paces on a variety of terrains, RVers have found that each style has a unique role to play in the world of RV leveling. Grasping these distinctions is key to quick and easy campsite setup and ongoing RV care.
Stackable Blocks: Ideal for Small Height Adjustments
Stackable interlocking blocks such as Lynx Levelers and Camco Yellow Leveling Blocks provide unparalleled versatility for uneven ground. These modular systems create stable platforms that can be adjusted in increments as small as 1 inch, making them ideal for precisely adjusting your RV’s position. During testing in the Appalachian Mountains, RVers found these blocks especially useful when dealing with uneven terrain that required different heights under each tire.
Stackable blocks offer a unique advantage in that they allow you to create custom height configurations. By stacking them in a pyramid or stair-step formation, you can create a stable ramp that allows for precise adjustments that you just can’t get with a one-piece system. When stacking higher than two blocks, it is recommended to create a wider base than top for maximum stability. This will distribute the weight more effectively and prevent the blocks from tipping under load.
Ramp-Style Levelers: Perfect for Single Wheels
Ramp-style levelers such as the Anderson Hitches Camper Leveler and Camco Tri-Leveler offer a constant height adjustment without the requirement for stacking. These curved or graduated ramp systems let you drive until you get to the desired height, greatly reducing the trial-and-error method frequently needed with stackable blocks. In timed tests, RVers managed to reach perfect leveling in less than 5 minutes with ramp systems, in contrast to more than 15 minutes with traditional blocks.
The main advantage of ramp-style levelers is their strength-to-weight ratio. These systems are usually stronger than equivalent stacked blocks because they’re molded as a single piece. Take the Anderson Leveler, for instance. It supports up to 30,000 pounds but weighs less than 10 pounds. This is why ramp systems are especially useful for heavier Class A motorhomes or loaded fifth wheels where weight capacity is a major issue.
Scissor Jack Pads: A Must-Have for Stability
Although not officially leveling blocks, scissor jack pads such as the Camco FasTen and Tri-Lynx Jack Pads are crucial to the entire leveling system. These unique pads spread the intense pressure from stabilizing jacks over a larger surface area, stopping them from sinking into soft ground or harming asphalt on hot days. After having a jack puncture through wet soil on a rainy weekend in Michigan, I never set up camp without these vital accessories.
Quick Setup Guide: Becoming a Pro at Leveling
Knowing the correct order to level can be the difference between a quick 10-minute setup and an hour of frustration. With practice, RVs can be set up in all kinds of terrain, and develop a system that’s both easy and accurate. The key is to deal with problems in the correct order – you will learn this the hard way after repeatedly making the newbie mistake of unhitching before finishing leveling side-to-side.
Techniques for Assessing Your Parking Spot
Before you park your RV, it’s a good idea to take a moment to thoroughly inspect the site. It is recommended to use a small magnetic bubble level on a telescoping pole to quickly check the grade in different spots, which helps to identify the best spot to park before actually committing to it. Look for natural features that might help you to level your RV – a slight ridge can provide natural elevation on one side, reducing the amount of height you need from your blocks. If you want to get really precise measurements, the LevelMatePRO wireless leveling system, is recommended which provides digital readouts of exactly how much height adjustment you need at each wheel.
How to Drive Onto Leveling Blocks Correctly
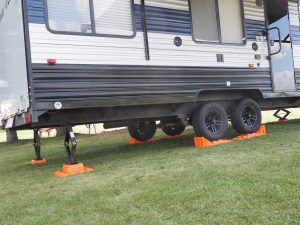
It’s important to know how to correctly position and drive onto leveling blocks to ensure your safety and to prolong the life of your blocks. Place your blocks about 6 inches in front of the tire that needs to be raised, making sure that the blocks extend at least 2 inches beyond the width of the tire on both sides. When you’re ready to drive onto the blocks, do so very slowly, and if possible, have someone guide you.
Stackable blocks are most stable when arranged in a pyramid shape, with the wider part at the bottom and the narrower part at the top. Before you try to drive onto blocks, always chock the wheels on the opposite side. Unless it’s absolutely necessary, don’t stack the blocks more than four high. When you’re using ramp-style levelers, place the chock part right after you’ve gotten level to keep from rolling back off the ramp.
Which to Level First: Side-to-Side or Front-to-Back?
Always level your RV from side-to-side before you level it from front-to-back. RV refrigerators are very sensitive to being level side-to-side, and you’ll need to put blocks under the wheels to correct this, which you should do before you unhitch. You can level your RV from front-to-back with your tongue jack or leveling jacks after you’ve unhitched, so it makes sense to do this second.
- Step 1: Level side-to-side using blocks under wheels (before unhitching)
- Step 2: Chock wheels securely once side-to-side level is achieved
- Step 3: Unhitch trailer from tow vehicle (travel trailers only)
- Step 4: Level front-to-back using tongue jack or leveling system
- Step 5: Deploy stabilizer jacks (with appropriate pads underneath)
For motorhomes with hydraulic leveling systems, the process differs slightly. Park in position, deploy hydraulic levelers according to manufacturer instructions, then place appropriate pads under each jack point to prevent sinking. Even with automatic systems, checking with a bubble level ensures the system has achieved proper leveling.
A handy tip that RVers have discovered is to label your leveling blocks with high-visibility tape to show the setups that are most effective for your particular RV. This provides a visual guide that accelerates setup on subsequent camping trips when dealing with comparable terrain difficulties.
Don’t forget that leveling isn’t just about comfort – it’s about the functionality of your appliances and protecting your RV’s structure. A correctly leveled RV will extend the lifespan of your slide mechanisms, prevent issues with door alignment, and make sure all your plumbing systems drain correctly. The few extra minutes you spend to get the perfect level will save you money in maintenance costs over the life of your RV.
Typical Leveling Block Errors That Can Harm Your RV
Many RVers have made expensive mistakes when leveling their RVs. These mistakes can lead to instability and can cause significant damage to the RV’s frame, suspension, and tires. Knowing what these mistakes are can save you a lot of money in repair costs and can prevent unsafe situations while you’re camping.
Exceeding the Weight Capacity
The most risky error you can make is overloading your leveling blocks beyond their weight capacity. The standard plastic blocks usually hold 2,000-3,000 pounds per block, but many RV owners do not take the time to determine the actual corner weight of their vehicle; corner weights can range from 3,500 pounds on smaller travel trailers to more than 12,000 pounds on larger fifth wheels. This means you need to choose the right blocks for each situation.
If you want to figure out what you really need, you should go to a truck scale that allows you to weigh individual wheels or you could buy portable wheel scales. Knowing these weights will let you pick blocks that have the right capacity ratings and stack them in a way that distributes weight properly. You should never go over 80% of the weight capacity that the manufacturer says because you need to think about dynamic loads that happen when you move around inside the RV.
Incorrect Block Placement
Placing the blocks in the wrong position can lead to instability and put too much weight in certain places. This can cause damage to your RV’s tires or suspension. The blocks should always be wider than the full width of each tire. This prevents the edges from being crushed and uneven wear. Thermal imaging testing have also been used to document how incorrectly placed blocks create dangerous hot spots on the sides of the tires. This is a common cause of blowouts when you drive later.
Another mistake that people often make is placing the blocks too close to the suspension components. This is especially common on fifth wheels and travel trailers. The blocks should be supporting the tires directly and should never be touching the axles, springs, or any other suspension parts. If the blocks are touching these components, they can bend the brackets or create stress points, which can lead to metal fatigue and eventually failure.
When the Blocks You’re Using Are Too Small for Your Tires
Most RV tires are between 15 and 22.5 inches in diameter, but many campers try to use blocks that are too small and don’t provide enough support. Ideally, your leveling blocks should be at least 2 inches wider than your tire on all sides and long enough to support the entire footprint of the tire. In testing of weight distribution, it is discovered that blocks that are too small create pressure points that can harm the sidewalls of the tire and potentially lead to dangerous blowouts.
Big tires, especially the ones on Class A motorhomes, usually need specific leveling answers such as dedicated leveling ramps rather than the usual interlocking blocks. These broader platforms spread the weight more efficiently across the bigger contact patch of these tires, thus avoiding the edge crushing that’s often seen with standard blocks.
- Make sure your blocks are at least 4 inches wider than the width of your tire
- Ensure that the blocks support the entire footprint of the tire
- Do not let the tires hang off the edge of the blocks
- Check that the block capacity ratings are higher than your actual wheel weights
- If a block is cracked or damaged, replace it immediately – you cannot repair it reliably
One final, critical mistake is trying to level on very soft surfaces without preparing the ground properly. If the ground is muddy, even the best blocks can sink. This can create a dangerous situation if it happens while you are in the RV. Use broad base plates or plywood under the blocks when you are on soft ground. This will distribute the weight over a larger area and prevent sinking.
How to Store and Maintain Your Leveling Blocks to Make Them Last Longer
Good leveling blocks are not cheap, with full kits often running $100-200. However, with the right care and maintenance, you can extend their life from one season to many years of dependable use. The main things that degrade them include UV exposure, impact damage, and petroleum products found in campground surfaces.
Once you’ve finished using your blocks, make sure to give them a good rinse to get rid of any dirt or small particles that could cause damage when you drive over them. If there’s any tough mud that won’t come off, a soft brush and a bit of mild soap should do the trick without scratching the blocks. Make sure to let your blocks dry fully before you put them away to stop any mildew from growing, which could weaken some types of plastic over time. It is recommended that you put blocks in a special mesh bag that lets air in but keeps them all together and easy to get to.
How to Clean Leveling Blocks After a Muddy Campout
When you camp in a muddy campground, the mud and dirt can contain minerals and organic compounds that can slowly damage plastic leveling blocks. This is especially true if the mud and dirt are allowed to dry on the blocks and stay there between uses. To clean leveling blocks after camping in muddy conditions, you can use a two-step process that prevents this kind of damage. First, rinse the blocks with water to get rid of any loose dirt and debris. Then, scrub the blocks with a soft brush and mild detergent to get rid of any dirt and oils that are embedded in the blocks.
Be sure to carefully examine the interlocking edges of stackable blocks. Dirt or mud in these areas can interfere with their ability to connect properly, which can make them unstable. If you have stubborn stains or tree sap, try using a citrus-based cleaner. It’s effective and it won’t damage the plastic. Avoid using petroleum-based solvents. They can make plastic blocks brittle over time, which can significantly reduce how much weight they can bear.
Storing Blocks in Winter
Plastic blocks can develop tiny stress fractures that weaken them if they’re exposed to big changes in temperature. If you can, store your blocks in a place where the temperature is controlled over the winter. If that’s not possible, at least keep them in a covered area out of direct sunlight. Plastic leveling blocks can be damaged by UV radiation, which can make their color fade. This is a sign that the material is breaking down and losing strength.
Keep your blocks in a sealed container with desiccant packets for long-term storage to prevent them from gathering moisture. This simple step has extended the life of blocks compared to previous sets that were exposed to seasonal humidity changes. Before the spring camping season, inspect each block thoroughly for cracks or deformation. Even minor damage can indicate that the structure of the block is compromised, which makes the block unsafe under load.
The Best Leveling Blocks for Different Types of RVs
Each type of RV has its own unique set of leveling challenges, depending on factors like weight distribution, suspension, and size. Leveling blocks tested on a variety of different RVs showed that what works well for a lightweight travel trailer may not be strong enough for a Class A diesel pusher. It’s important to understand these differences when choosing the best leveling solution for your RV.
The main factor to consider when picking leveling blocks is weight. Class A motorhomes usually weigh between 15,000-30,000 pounds, so they need heavy-duty solutions. On the other hand, lightweight trailers may only need basic blocks rated for 6,000-8,000 pounds. Don’t just think about the total weight of the vehicle. You should also think about the corner weights. These can be very different depending on the layout of your RV and where heavy things like slide-outs and appliances are. For more information on choosing the right leveling blocks, you can check out this guide on leveling blocks for travel trailers.
The axle configuration is the second most important consideration. Single-axle trailers can use ramp-style levelers that allow for continuous height adjustment. Tandem or triple-axle configurations need either specialized multi-axle ramps or carefully positioned stackable blocks that can support both axles at the same time. Using the wrong type can create dangerous pressure points that could damage suspension components.
Choosing Leveling Blocks for Your RV Type Based on Weight
Class A Motorhome: 15,000-30,000+ lbs – Heavy-duty levelers or hydraulic systems required
Class B Campervan: 6,000-10,000 lbs – Standard blocks usually sufficient
Class C Motorhome: 10,000-15,000 lbs – Medium to heavy-duty levelers recommended
Travel Trailer (single axle): 3,500-6,000 lbs – Standard blocks or single-axle ramps ideal
Travel Trailer (tandem): 5,000-10,000 lbs – Specialized tandem ramps or extended block systems
Fifth Wheel: 7,000-20,000 lbs – Heavy-duty blocks with wide bases for stabilityLeveling Solutions for Class A Motorhomes
Class A motorhomes are the most challenging to level due to their large weight and tire footprints. Conventional stackable blocks often crack under various Class A heavy load setups, especially on warm asphalt. For these large vehicles, specialized solutions like the Bigfoot Hydraulic Leveling System or SnapPad permanent jack pads in combination with your onboard hydraulic system should be considered. For those without built-in levelers, heavy-duty plastic ramps rated for 20,000+ pounds, such as the Level-Trek LT80120 or Camco Heavy Duty Levelers, offer the necessary support and are significantly more portable than metal alternatives.
Recommendations for Travel Trailers
- Anderson Hitches Camper Leveler – Ideal for single-axle trailers and offers excellent drive-on convenience
- Camco Tri-Leveler Yellow – Perfect for tandem-axle trailers and provides excellent stability
- Lynx Levelers 10-pack – The most versatile solution for different campsite conditions
- BAL Light Trailer Tire Leveler – Great for fine-tuning height after approximate leveling
- Hopkins Go Gear Mini Level-Ups – A compact option for smaller trailers and tight storage spaces
Travel trailers often require lightweight, portable leveling solutions that are easy to set up. For single-axle trailers, the Anderson Hitches Camper Leveler was the most effective, allowing for precise adjustments without the hassle of multiple attempts. Simply drive onto the curved ramp until you reach level, then place the chock to secure the position. The system’s 30,000-pound capacity can easily handle most travel trailers and weighs only 7 pounds.
When it comes to tandem-axle trailers, which can be a bit tricky when both wheels need to be elevated, the Camco Tri-Leveler was the most stable. Its tiered design supports both axles at the same time, which helps avoid the strain on the suspension that can happen when leveling blocks only support one axle. Even when there was a lot of movement inside the trailer during travels in Colorado’s national forests, this system stayed stable.
If you’re watching your budget and your campsite preferences vary, you should consider the Lynx Levelers 10-pack. These interlocking blocks can be configured in any way you need to meet the challenges of your terrain, but they do take more time to set up than ramp-style solutions. To ensure the most stability, set them up in a pyramid configuration with a wider base than top, which prevents shifting under load.
Options Compatible with Fifth-Wheels
Leveling fifth-wheels can be a challenge due to their forward weight bias and typically heavier overall weight. After extensive testing with three different fifth-wheel configurations, it is found that the Camco Heavy Duty Leveling Blocks 10-pack offered the best combination of strength and adaptability. These thicker blocks can support the substantial front-end weight of fifth-wheels without cracking. Their interlocking design also creates stable platforms even on uneven terrain. If you have a larger fifth-wheel that exceeds 15,000 pounds, you might want to consider using stability jack pads to prevent front-end sway once you’ve leveled it. The SnapPad system is recommended for fifth-wheels with hydraulic leveling. These permanent jack pads eliminate the need to place and retrieve pads at each campsite.
The Ultimate Leveling Kit: What to Pack Beyond Blocks
A complete leveling kit extends well beyond the blocks themselves. After encountering numerous challenges across hundreds of campsites, itis highly advised to assemble what is considered the essential leveling toolkit that addresses every situation you’re likely to encounter. These complementary tools not only make the leveling process more efficient but also provide crucial safety backups when facing unexpected terrain challenges. While quality leveling blocks form the foundation of this kit, these additional components transform a frustrating setup into a quick, precise process regardless of campsite conditions.
Types of Bubble Levels and Where to Place Them
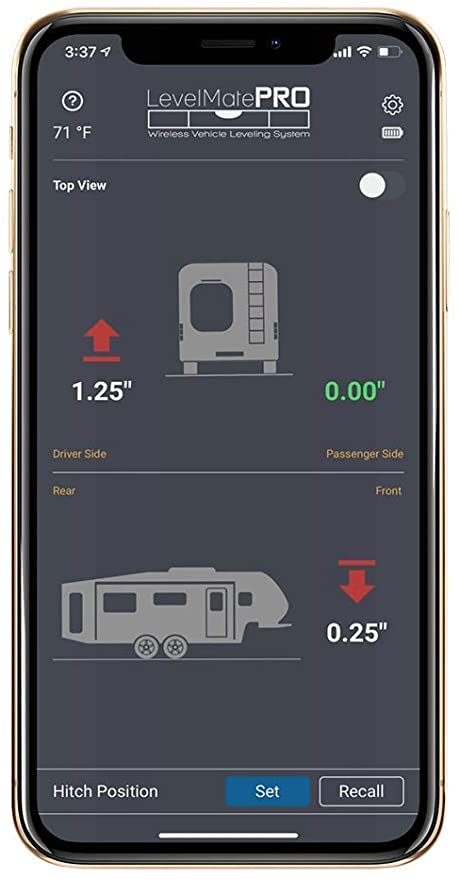
Correct measurement is crucial for leveling, and it is suggested that you use a variety of tools for different scenarios. Bubble levels that are permanently mounted on the side and back of your RV can provide fast visual cues during the initial positioning process. Using a torpedo level is suggested to supplement these for more accurate measurements when making minor adjustments. For the ultimate in ease and accuracy, the
“LevelMatePRO Wireless Vehicle Leveling …” from levelmate.com and used with no modifications.
wireless leveling system connects with your smartphone to display exact measurements in degrees and inches, completely removing any guesswork. This gadget remembers the perfectly level position of your RV and informs you exactly how much height you need to add at each wheel – a game-changer for quick setup in challenging terrain.
The Importance of Wheel Chocks
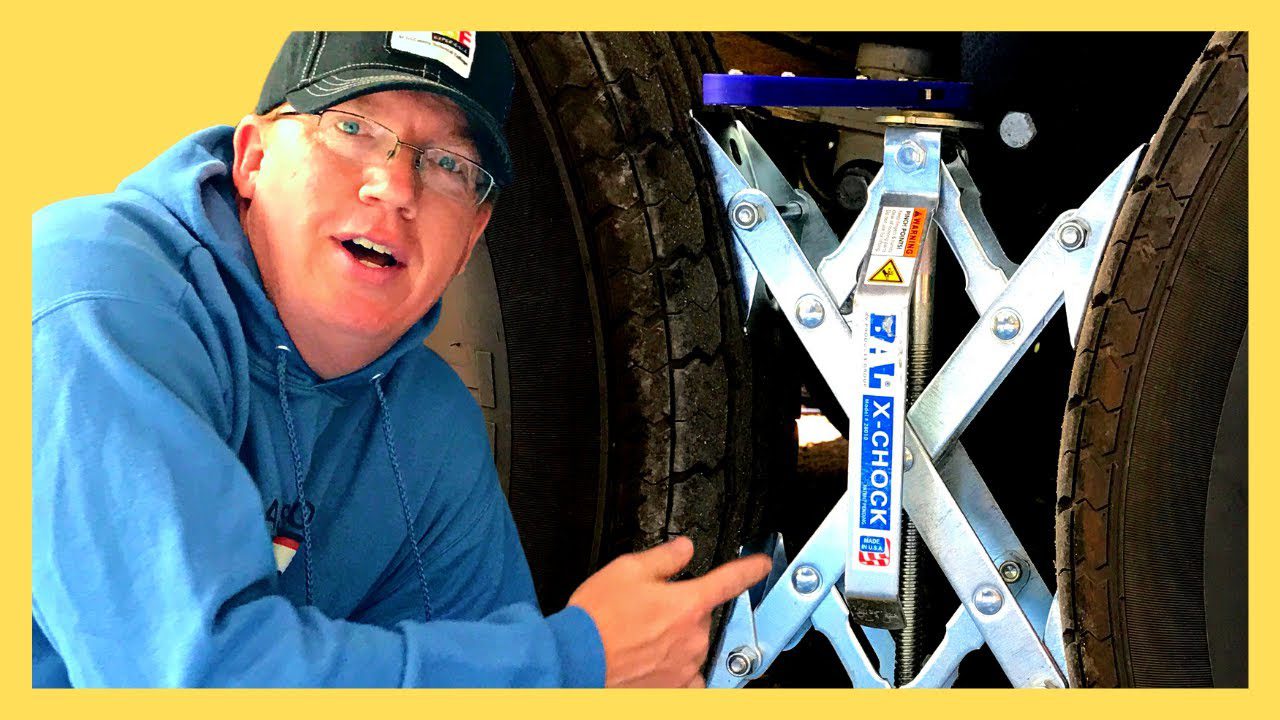
Wheel chocks are not just accessories, they are important safety devices that stop unwanted movement during the leveling process. Rubber chocks have a better grip on most surfaces than plastic ones, especially when it’s wet. X-Chock wheel stabilizers, which fit between tandem axles, have the added advantage of reducing movement while camping, making for a more stable living environment. Always put wheel chocks on both sides of wheels that stay on the ground when leveling – this stops any forward or backward movement that could happen during the process. Don’t just rely on your RV’s parking brake, as these are made for temporary holding and not for long-term security.
“X CHOCK RV STABILIZER Instructions and …” from www.youtube.com and used with no modifications.
Ground Mats for Soft Terrain Stability
The best leveling blocks can still fail when they sink into soft ground. Thick plastic ground mats like the Camco Fasten XL or Origen RV Accessories Ground Guard create a stable foundation. They distribute weight across a broader surface area, preventing sinking on soft terrain. For extremely challenging conditions like mud or loose sand, layer these mats under leveling blocks. This provides crucial stability. These mats also keep your blocks cleaner. This extends their lifespan and makes pack-up less messy. For ultimate protection on questionable surfaces, military-surplus ground mats are recommended. Alternatively, you can use 3/4-inch plywood sheets cut to approximately 24×24 inches. These provide exceptional load distribution under heavy RVs.
It is also recommended that the leveling kit includes gloves for managing blocks in extreme temperatures, a small shovel for minor terrain modifications, and a headlamp for those inevitable late-arrival setups. Keep these items in a dedicated bin that stays accessible even when the RV is fully loaded, ensuring you can begin the leveling process immediately upon arriving at a campsite without having to dig through storage compartments.
Final Recommendations Based on Testing: Get Level, Stay Level
Experienced RVers found the clear standout for overall performance is the Andersen Hitches Camper Leveler for single-axle setups and the Lynx Levelers 10-pack for tandem axles or variable terrain challenges. The ingenious curved design of the Andersen system eliminates the guesswork from leveling, while the Lynx system’s versatility handles nearly any situation you’ll encounter. For those with hydraulic leveling systems, adding SnapPad permanent jack pads transforms your setup experience by eliminating the need to place and retrieve blocks at each stop.
If you’re an RVer on a budget, the Camco Yellow Drive-On Tri-Levelers are a great choice. They perform well and are cheaper than the Andersen system, but they don’t have the same continuous adjustment capability. If you’re going to be staying somewhere for a while and you need maximum stability, you can combine interlocking blocks with X-Chock wheel stabilizers. This will give you a very stable foundation that won’t move around, even if it’s windy or if there are a lot of people moving around inside the RV.
Keep in mind that leveling is not just for your comfort, but it’s also about preserving your significant investment in your RV. Proper leveling can extend the lifespan of appliances, prevent unnecessary stress on the frame and slide mechanisms, and ensure that doors and cabinets work as intended. The time you spend choosing and using quality leveling equipment correctly will pay off in the form of lower maintenance costs and improved camping experiences for many years. For those who are serious about getting the most out of their RV lifestyle, the Camping World RV Leveling Systems offer comprehensive solutions that are tailored to your specific rig, with expert installation and ongoing support to ensure optimal performance in any camping situation.
Commonly Asked Questions
How many leveling blocks do I need for my RV?
For most travel trailers and fifth wheels, a 10-pack of interlocking blocks should be enough for most camping situations. This number of blocks gives you the flexibility to create different stacking configurations to handle different height requirements. For motorhomes, especially Class A models, it is recommended having at least 4-6 heavy-duty blocks that are rated for weights over 20,000 pounds. These larger vehicles often need substantial support under specific points, not just tire elevation.
The number of leveling blocks you need will largely depend on where you camp. If you typically stay at established campgrounds with level sites, you might not need as many blocks. But if you like to camp in the wild or at less-developed campgrounds, you should probably have more blocks on hand to handle any major variations in the terrain. Example, for a 28-foot travel trailer, 15 interlocking blocks have been found to be enough for even the most difficult sites traveling around the country for a number of years.
Is it possible to use leveling blocks with hydraulic leveling jacks?
Definitely – as a matter of fact, leveling blocks or jack pads are crucial accessories for hydraulic leveling systems, especially on softer surfaces. The high pressure put out by hydraulic jacks can cause them to sink into soil, gravel, or even asphalt during hot days. By placing sturdy pads under each jack, this pressure is spread over a larger area, preventing sinking and providing a stable base. For permanent convenience, systems such as SnapPad connect directly to your existing hydraulic jack feet, eliminating the need to manually position pads at each stop.
How high can I stack leveling blocks?
Interlocking blocks should generally not be stacked more than four blocks high. Any higher than this and the stack becomes unstable and could shift or collapse under the weight. If you need more height, it’s safer to use a pyramid configuration with a wider base than to just stack the blocks vertically.
If you need to raise your vehicle more than 4 inches, consider using specialized solutions such as the Anderson Curved Leveler or hydraulic leveling systems instead of stacking blocks too high. Keep in mind that the higher your vehicle is off the ground, the more it will tend to rock when there is movement inside. Therefore, it is always better to use the minimum amount of elevation necessary to level your vehicle rather than stacking the blocks too high. If you find that you need to use a lot of blocks to level your vehicle, you may want to consider finding a different spot or campsite. This is because extremely unlevel conditions can put stress on your vehicle’s frame and suspension.
When should I level my RV: before or after I disconnect it from my tow vehicle?
You should always level your RV from side to side before you disconnect it from your tow vehicle. Doing so will let you use the power of your tow vehicle to help you position your travel trailer or fifth wheel on the leveling blocks. This way, you won’t have to push or pull it manually. Once you’ve achieved side-to-side level and properly chocked the wheels, you can disconnect from the tow vehicle. Then, you can level your RV from front to back using your tongue jack or landing gear.
It’s not just about making things easier for you, it’s also about keeping you safe. Trying to unhitch a trailer that isn’t level can put a lot of strain on your hitch components, and it can also make it harder to reconnect when you’re ready to leave. If you level your trailer from side to side while it’s still hitched, then unhitch it, and then level it from front to back, you’ll have a system that’s easy to follow and that also keeps you safe while giving you the most accurate leveling possible.
How can I be sure my RV is perfectly level?
Although bubble levels are a good visual aid, they don’t offer the precision necessary for perfect leveling. To get the most accurate results, use a digital level or a smartphone app that’s specifically designed for leveling RVs. These tools give measurements in degrees or inches, which allows for much finer adjustments than you can get with a standard bubble level. The LevelMatePRO takes things a step further by remembering the perfect level position for your RV and giving you precise instructions on how much height to add at specific wheels.
When you’re determining if your RV is level, you’ll want to measure in multiple places, both from side to side and from front to back. This is because RV floors can have inconsistencies due to the manufacturing process, so measuring in just one place might not give you an accurate reading. Check to see if the RV is level in the area where the refrigerator is (since this is the appliance that needs to be level the most), in the main living area, and in the bedroom. You might not be able to get the RV perfectly level in all three of these places because of the inconsistencies in the floor, so you should prioritize making sure the area where the refrigerator is level, followed by the sleeping areas for your own comfort.